WEEK FOURTEEN: RETROSPECTIVE and the RIG
My original goal this semester was to make 2-3 miscellaneous props each week. Literally whatever I feel like modeling, though most of it sticks to a cyberpunk theme because that's where my mind wants to go. The idea was to do something relatively low pressure that would keep my 3d art skills fresh, so I could focus most of my designer brain on our game, The Dreaming Lake. Another goal was to raise my standards for realism in my modelling, since I often tend more towards a low-poly game modeling style.
Did I achieve those goals? Ehh. It turned out not to be as low pressure as I thought it would. Most weeks, by the time I was at a point where I had some free time on my hands, I was tired and burnt out, so finding the motivation to model something was sometimes tough. I will say that the game turned out really really well and it took up hours and hours of my time. I'm talking so many late nights.
Fortunately, of the props I did make, I absolutely was able to push myself further towards realism. The props I made were pretty high quality, and I am satisfied with how each of them turned out. Favorites of mine are the guitar and the record player.

Going forward, I would try to find a better balance in my work and life overall. I feel like I took on some extra work on the game because I wanted to avoid letting my team get too burnt out, but of course that just means I got more burnt out because of it. But, like I said, the game turned out great.
So, if you ask me, it was worth it.
Now, for a quick bonus post about what I did over here this week.
This week I... well mostly I was thoroughly busy getting The Dreaming Lake finished. Over here, however, I've been rigging. Honestly, the realism of this prop is sort of eerie to me, since it matches the real thing so closely.
This actually has two different armatures, one for the strap and one for the guitar itself. The strap has about 30 bones, with IK points at each end. The ends are both parented to attachment points on the guitar rig, which means that the guitar is what's driving how the strap moves. The guitar has bones for each of the strings, tuning pegs, and for the two attachment points for the strap.
Week Thirteen: 👁

This week, I finished up the guitar strap, and made a model of a really cool CCTV sign that someone gave me recently. Not too complicated, but that just meant I could focus on modeling them exactly to the reference.


Let's start with the guitar strap. My actual guitar did not come with an attachment for the strap, so I pulled an image of the one designed for the guitar from the maker's website. I loaded this image in Blender as a reference and modeled directly over it. Not really much to say there.

Now onto the sign. I traded someone for this sign recently. The detail of that "I see you..." written in sharpie the top left corner is what caught my eye. Below you can see the wireframe. There are plenty of triangles because... why not?

The model for the sign is pretty simple, but I did run into a snag worth mentioning. Turns out my Creative Cloud license expired, so I sent a request to ITSS to renew it and they just... didn't. So I ended up using Krita for some quick photo edits. Not a big deal but still, kinda inconvenient. It's a tool meant more for drawing than photo editing, and I didn't quite know what I was doing there.

The texture has only some subtle details, like a layer of dusty fingerprints on the roughness maps, and some extra smudging added to the sharpie.
Week Eleven: Progress Again
This week, I was able to accomplish what last week was meant to be about. I spent my time refining existing work and started putting them together in a scene.
Submitting this blog post as it is in case I don't get a chance to finish it up before Friday. Not sure whether I'll have reliable internet in the desert.
I updated the guitar textures with some much needed detail. Specifically I added some areas where the paint is really scratched off, meant to suggest years and years of use. I bought this guitar used, and when I got it it did not have a mount for a guitar strap. So my improvised solution was to make a loop out of tape and wrap it around the body, so I could hook the strap to that. It's a janky solution, but it's my solution and I love the aesthetic of it.
To suggest years and years of use, I really scratched up that one area where the strap attaches.

I also modeled the guitar strap itself! (Pictures soon)
I did some more work to the synthesizer. Again, I got lazy when it comes to matching the reference exactly. But I made sure that the empty spaces were at least filled.
__________________________________________________________________
WEEK TEN
This week, my plan was to revisit my existing props to refine and finish them up. I got through with all of the model change I wanted for the guitar and that's... it!

Additions include the small black bar above the strings, the strings themselves, and holes for the strings at the top.
As you can see, this did not turn out to be a terribly productive week for this class. Oh, well.
__________________________________________________________________
WEEK NINE:Guitar

Last week I mentioned I was planning on modeling a guitar... and that's exactly what happened. This is one of my two guitars, an acoustic-electric travel guitar. I figured this was a great candidate for modeling from a reference, and a good opportunity to use photo textures. A while ago I added some paint to it in the genderfluid pride colors, just making the markings by hand with acyrlic paint.

I took some front, back, side, and various close-up reference photos, and got to work. Above, you can see one of the close-ups that I used as a photo texture. Below you can see the same spot on the guitar model.

I ran into.... some issues when modeling. Some frustrating issues. Have you ever had this experience where you went for so long without making a certain mistake, that you thought you weren't even capable of making that mistake? Yeah, that happened to me.
I got so frustrated with my UVs. No matter what I did, everything was waaay out of proportion! As far as I could tell, I had all the cuts in the right places, yet the shells for the main body and fretboard came out tiny while the tuning pegs were massive. I struggled for a little while until it finally clicked:
I didn't apply transformations.
The scale was way off, and that was throwing off the proportions for the UVs. Honestly, I'm not sure I've ever made this mistake. There's a very real chance that I managed to avoid it entirely... until just now.
That slowed me down by almost half an hour, and I ended up tiring myself out before I could get all the details in that I wanted. I ended up leaving the strings out entirely... for the moment. I took previous feedback into account when detailing this, and added little scratches in deliberate areas.


The whole model sits at 7957 triangles, with one 2k texture.
__________________________________________________________________
WEEK EIGHT: SYNTH

This week, I found my way back to the theme I had loosely started on this semester: music studio equipment. Ages ago, I found this godawful photogrammetry scan of a Microkorg synthesizer on sketchfab, and downloaded it to use in my CAGD 420 scene. I never ended up using it because, again, it was awful. Seriously, that model was so trash, but there was enough there to work as an awesome guide.

Like I said, the reference I found was trash. But it was also treasure... or whatever.

Modeling this thing ended up being a little bit complicated, but nothing I wasn't already used to. My biggest challenge this semester has been with fighting against my low poly instincts. For a while, the large plastic base of this thing had sharp, hard edges. I am getting a lot more comfortable with beveling small areas of models, to get that extra level of detail that my game developer brain tells me to leave out. I did some much needed beveling eventually, but I didn't do it in a super clean way and had to fix a lot of issues.
Turns out if you stay up until five am, that has an effect on your ability to 3d model complex forms the next day.

"Corgi" felt like the natural choice to parody the brand name here. The texture isn't actually done yet, but I've gotten pretty far with it. Making all the labels has proved to be so incredibly tedious. I started off sticking to the reference with absolutely faithfulness, then as I made my way across to the right I got a little bit tired... which you can kinda see if you look closely.
Next week, I'll include the final version of this thing along with whatever I end up making. I'm thinking about modeling one of my guitars, and it's got some special details I would love to replicate.
__________________________________________________________________
WEEK SEVEN: As Seen on TV

Once gain, I kept up my "strategy" of modeling only when in a state of panic. Like I've said, in order to get anything done I have to just pick an idea and make it, whatever it is. This time, I ended up with an old style TV. I have a habit of getting very involved in the development of the game I'm designing. I really need to learn to back off, be less like Buffy the Vampire Slayer and more like Mr. Giles, the watcher. It takes a lot out of me, and there's not much left for other projects. That said, I managed to get something done that I'm proud of.

I ended up leaving some of the details to the texture. Rather than model out the buttons or the vent, I just kinda faked them in painter. This may not be the best for realism, but it looks decent enough. Just as long as they're small buttons. EvyTV is a reference to an alias I use online.


There is this one image from Cowboy Bebop that lives rent free in my mind, and I have felt so tempted to recreate it. So that's just what I did. Well, that's what I tried to do anyways. The physics sim wasn't acting quite like I wanted it to, so I got frustrated and just dropped a massive TV on the scattered pile.

__________________________________________________________________
WEEK FIVE: Monitoring the Situation

This week, it took a lot less time to figure out what to make. I scratched my head for a little bit, did some googling for inspiration, then found my way over to the IMDB page for Bladerunner 2049. I came across this image of a monitor. Rather than use it as inspiration for something new I just kinda... made it. What can I say, I guess the designer part of my brain is already fully occupied elsewhere. Gotta say though, I feel so damn satisfied with how this turned out.

I decided to embrace booleans. In this case, it felt best to simply cut away the sections at the top and bottom, rather than go crazy with modeling them manually. I mean, that is exactly the kind of thing booleans are for. I contained their damage, and simply triangulated the faces that it cut up into n-gons.

Here you can see the wireframe with my color ID map. Those color IDs were made using vertex colors instead of materials, so I did not need to use a separate model export to bake the IDs. In total, this thing is 1970 tris, with 2k textures.


Video of a WIP version, before adding labels
My favorite part of this texture was the screen. Ages ago I came up with this process for texturing old-looking screens with scanlines, and I refined it by adding some chromatic aberration. On the left is what the screen looks like without any of the filters or extra layers turned on, and the right is the complete look.


__________________________________________________________________
WEEK FOUR: GOT A LIGHT?
Heyo! It took a little while to figure out what I wanted to do this week. I find that when I do get an idea, I just have to go for it. whatever it is. I ended up going with this electric lighter.

My sibling found this on the sidewalk a week ago and gave it to me. You may have noticed in some of my other work, but I really love the look of purple lights reflected on chrome metal surfaces. What can I say, I collect shiny things. I liked the qualities and damage on the surface of the lighter, so it was a good candidate for a 3d replica.

Modeling it was fairly straightforward, as expected. It did prove to be decently complicated in a few places. The real interest comes through in the texturing. I tried to match the details present in the real thing, then added some of my own. Mostly by scratching the hell out of it.

Not gonna lie, this does not quite match my goals or the standard I know I'm capable of. But hey, it is a prop that I spent some time on and put some thought into. Gotta take the little victories. I like how it turned out, though I feel it is lacking on micro-details.

__________________________________________________________________
WEEK THREE: Well that's.... uh.... something!
This week I had hardly any energy left after my other projects, especially the one I'm leading. To be honest, I'm emotionally drained and my creative resources have been totally spread thin. I have no new props to show off here. Now hopefully I can achieve some semblance of a healthy sleep schedule.
I do have one thing I can share, at least! I textured a record disc, and made a hot new render of the turntable. The album art itself is from an album by Robojom, my favorite electronic punk band from Montreal.

__________________________________________________________________
WEEK TWO: Adding PUNK to cyberpunk

One thing that often bothers me about a lot of the stuff out there with a cyberpunk label is that it's just not punk enough. They get the sci-fi aspect down, but that's not really what cyberpunk is about. So I figured, why not start with something punk? A turntable seemed like the natural choice. I put on a cyberpunk synth playlist and got to work.

I made this turntable following a couple of real-world references, but mostly I went my own direction with the design. Instead of a fully rectangular body, I made one that tapers downwards. Instead of a switch or a button for the RPM, I gave it a little bit of technological flare with a touchscreen display, complete with scanlines. Oddly enough, modeling this thing made me think back to that one faucet tutorial I did ages ago.

I had a ton of fun detailing this thing. Of course, I had to add some signatures. Like the DopeDoe brand name, which I've used in many other places. Stickers are always fun! Threw in some pride hearts, Catra, Dr. Coomer, Noodle, and the Viral Love logo
The biggest issue I ran into had nothing to do with my process, it was pure technology nonsense. Ever since I upgraded to Blender 3.0, it's had this funny habit of crashing, particularly when exporting a model. After a few crashes, Blender started just crashing on start-up. It ended up taking two hours after finishing the model until I could get it into Substance Painter.
It took a very slow restart before I could get back. But once I downloaded the 3.0.1 patch, things were a lot smoother. Let's hope that lasts!
__________________________________________________________________
Week One: I know what I'm doing here
After hearing some great advice, I've decided on a more solid plan. My mind wants to stay in my personal cyberpunk world, so I'm just going to give in to that fully. Each week I aim to make between one and three new props.
Here's a a project I did back in Fall 2020. Pretty sure I secretly wanted to live there.

My goals are:
1. Raise my personal standard for realism
2. Establish design themes to make assets that feel like they are part of the same shared world, like they were made by the same manufacturers or belong to the same person.
3. Detail the hell out of these props. Make it look like they have history.
4. Optional (when I feel like it): Downgrade assets for the GoldSrc engine (because I'm just like that)
And here's what those assets looks like in gorgeous 1998 quality.

So that's where my mind wants to go, but there's more. I am going to work on two different projects and share them here, and I feel like that's the way it needs to be. The cyberpunk one is my personal project, but I desperately need to keep up with my Beyond Skyrim involvement. I will be posting updates on my 3d art on that team. Being on a team with experienced 3d artists puts pressure on me to up my game, even makes me self conscious, and I want to be sure I am meeting modern standards.
__________________________________________________________________
WHAT AM I DOING HERE?
Howdy. This time, I would like to take a slightly more open-ended approach to my portfolio. I am not sure I will have the mental bandwidth to focus on a large scale unified portfolio piece, but I am always working on things.
Mostly I am going to be working on general 3d art, just modeling whatever comes to mind. I will continue to highlight my modding work here. Expect me to bounce around between different things.
There are two projects in particular I expect to focus on. The first one is a new project I am working on with a team of recent CAGD graduates. My role there is general 3d art and possibly animation. It's at an early stage right now, and it remains to be seen what direction it will take or what my involvement will look like. But I'll keep y'all posted.
I make no promises of consistency (except for consistent high quality)
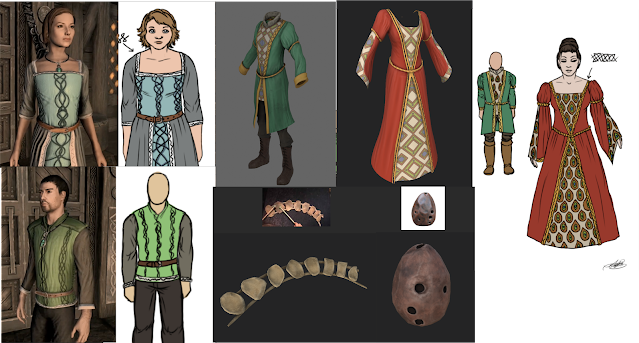
Back in June, I joined one of the teams for the Beyond Skyrim modding effort. I modeled some clothes for them, then school happened and I slowed way down. I intend to use this class to jumpstart my involvement on the team. Since I am on a team with 3d artists that have been working on their skills for much longer than I have, I sometimes feel self conscious about the work I do there. By sharing my work for critique in this class, I hope to raise my personal standards for realism and detail in the assets I create.
BUT WAIT, THERE'S MORE
While I'm at it, I may as well bring you up to speed on a third project you might catch me working on from time to time. I can never get away from Half-Life modding, but I felt I had to set aside my deep sea project for now. Working on horror for too long was kind of bringing me down. And while I'm leading a game production team, I do not have much bandwidth left for designing actual levels in other areas. But creating disconnected environments with no gameplay? Hell yeah!
This project is a return to my happy place, the neon signs, brutalist buildings, and chromed-up bodies of my personal cyberpunk world. This project has no name or story, but it has characters and places.
 |
| Leon. The subtly demonic protagonist (she's gay) |